This 3-day series features Air Fryer Honey Sriracha Shrimp, Gochujang Carbonara, and Vietnamese-style Meatball Lettuce Cups. Perfect for anyone who wants a taste of different cuisines throughout the week!
Get ready to dive into a flavor-packed fusion across Chinese, Korean, and Vietnamese cuisines. The key flavors for this week are sweet and spicy!
If you’re not too keen on spicy, you can always adjust the heat to your liking. Don’t skimp out on the other stuff though!
For vegetables, we’re keeping it simple by using some repeat ingredients like lettuce and tomatoes. You’ll be amazed at how they tie everything together for a week of tasty meals.
What to do with leftovers?
When you’re shopping, you might end up with more carrots and daikon than you need. No biggie! Double up on the pickled carrots and daikon recipe and pop the extras in the fridge. They’ll come to the rescue for future meal plans, and you’ll be so glad you did.
a Fun Fact on Sriracha
Did you know? That classic Huy Fong sriracha (you know, the one with the rooster) we all love has seen some flavor changes lately, thanks to a wild shortage and a whole contract drama. And last I’ve read about it, the classic flavor is never coming back.
So, now what? My research points to Underwood Ranches’ sriracha (yep, the one with the dragon label) as the closest match nowadays. If you’re out of sriracha, give theirs a shot next time you hit the store!
First time here?
Check out my Getting Started guide to learn how to use this meal plan.
Blanching vegetables serves 2 purposes: (1) It prevents loss of flavor, color, and texture—extending the “life” of the vegetable throughout the week, and (2) it gives us a head start in the cooking process for stir-fries. Stir-frying generally only takes 5 minutes. If you start from raw, some pieces won’t cook as evenly as others (especially hardy vegetables like broccoli). Blanching pre-cooks each piece of veggie so you will have a consistent tasting stir-fry every time. This is a well-known technique used in many Chinese restaurants!
Here’s how:
Bring a large pot of water to a rolling boil (about 6 cups) and add 1 Tbsp kosher salt. Prepare an ice bath in a large bowl on the side.
Blanch vegetables for the time indicated on the recipe/prep summary. The countdown starts when the water comes back to a boil, so don’t overcrowd! Once done, immediately transfer the vegetables with a sieve to the ice bath for a few minutes to stop the cooking process.
When vegetables have cooled, drain well and transfer to a storage container or Ziploc bag. Use a salad spinner to remove excess water for leafy greens or use clean hands to squeeze out remaining water.
You can repeat this process with all the vegetables using the same pot of water. Bring water back to a rolling boil before starting a new batch. Replenish ice to ice bath as needed to keep water cold.
Chopped Aromatics
Store in an air-tight container in the fridge to keep maximum freshness. Use them within 7-10 days. If you suspect it has gone bad – the color has changed (e.g. turns brown), there is visible mold, the texture is mushy – toss them. Always err on the side of caution to avoid food poisoning.
Chopped Veggies
Store in meal prep containers or in the bags they come with in the crisper drawer. If a vegetable has a high-water content and tends to go limp quick, wrap it with a paper towel before storing it in the fridge. The paper towel absorbs excess liquid that will prevent it from wilting or turning mushy.
Meat and Seafood
As a general guideline, try to use seafoodwithin 2 days of purchase. For this reason, I always place recipes with seafood earlier in the Meal Plan Menu. Meat can typically last 4-5 days. If you won’t be using meat and seafood, best to freeze them right away. Vacuum seal before freezing to prevent freezer burn.
Properly frozen foods are good for up to 6 months before their flavor and texture start to lessen.
If you do not have a vacuum sealer, wrap fish and meat tightly with saran wrap, then wrap tightly with aluminum foil. Store in a Ziploc bag, squeezing as much air out as possible. Date them and pop them in the freezer for later use.
When thawing vacuum sealed food, especially fish, puncture a hole or cut a slit in the bag to prevent the risk of botulism. Botulism thrives in low oxygen environment, which is what vacuum sealing does. (Note: when botulism grows, the smell and texture of the fish will not change, but the toxins it produces can be deadly.)
Use different cutting boards for your proteins and veggies. Always wash and disinfect knives when switching from meat to veggies to prevent cross-contamination. It goes without saying that you should clean your produce before consumption and preparation.
During prep, always start with food cooked at the lowest temperature first, working your way up. For example, chopped scallions are often used as garnish and will be consumed raw, so chop them before potatoes (which you will cook so the risk is lower). Likewise, you would prepare salad greens first.
The same principle applies when keeping them in the fridge. Don’t stack raw chicken above fish – any juices from the chicken that trickle into the fish would pose a risk. Should the chicken be contaminated with salmonella, the time and temperature at which you would cook fish to perfection is not enough to kill the bacteria.
Meal 1
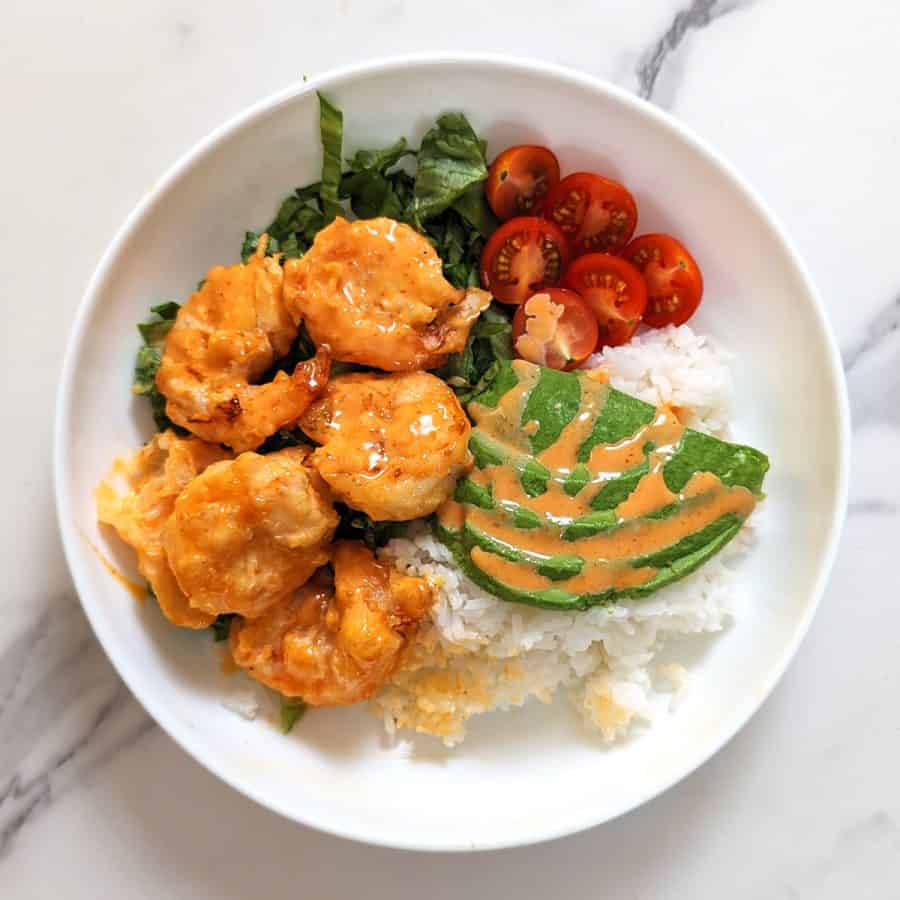
This Air Fryer Honey Sriracha Shrimp recipe is a delightful mix of succulent shrimp coated in a heavenly sauce with tantalizing blend of sweetness and heat. This dish pairs perfectly with a bed of crisp lettuce, cherry tomatoes, and creamy avocado slices.
Pro tip: save your egg yolk and add it to the Gochujang Carbonara in your next meal. No waste!
Substitutions
Shrimp: If shrimp isn’t your preference, try using extra firm tofu or chunks of chicken as an alternative.
Kewpie Mayo: While Kewpie mayo adds a unique flavor that I always highly recommend, regular mayonnaise can be used as a substitute without much difference in this instance.
Alternative Cooking Methods
Oven Option: Preheat the oven to 400°F. Place the breaded shrimp on a baking sheet lined with parchment paper and bake for approximately 10-12 minutes or until golden and crisp.
Shallow-Frying Approach: Heat a skillet with an 1/2 an inch of oil over medium-high heat. Pan-fry the breaded shrimp for 2-3 minutes per side until they achieve a golden, crispy texture.
Looking for a dish that's a tantalizing blend of sweetness and heat? This air fryer shrimp recipe is a delightful mix of succulent shrimp coated in a delicious Honey Sriracha sauce!
Prep Time25 minutesmins
Cook Time5 minutesmins
Total Time30 minutesmins
Course: Main Course
Cuisine: Asian, Chinese, Fusion
Keyword: 30-minute recipes, air fryer shrimp
Servings: 2
Equipment
Air fryer
Ingredients
1/4head iceberg lettuceshredded
1/4cupcherry tomatoes
1medium Hass avocadosliced
12ozlarge shrimppeeled and deveined
1/4cuppanko breadcrumbs
Cooking spray
Marinade:
1tspsugar
1/4tspkosher saltuse less if shrimp is already salted from frozen
1/4tspbaking powder
1large eggwhite only, lightly beaten (reserve egg yolk in an airtight container)*
2Tbspcornstarch
Sauce:
1Tbsphoney
1/2Tbspsrirachaor more to taste
2.5TbspKewpie mayo
2tsplime juicepreferably freshly squeezed
Instructions
Mix sauce together in a medium mixing bowl and set aside. Mix marinade together in another bowl until smooth and thick. Add the shrimp and coat well with the marinade. Let it sit for 20 minutes.
Preheat the air fryer to 400F. Meanwhile, dip each piece of shrimp into the breadcrumbs and coat well on both sides. When the air fryer has reached temperature, lightly spray the basket with cooking oil. Place the shrimp into the air fryer, making sure they do not touch. Spray another light coating of oil over the shrimp. Cook until golden brown and crisp (about 5 minutes).
Transfer the shrimp to the bowl of sauce and toss to coat well. Serve over a bed of lettuce with steamed rice and cherry tomatoes. Drizzle remaining sauce over avocado if desired. Enjoy!
Notes
Save the egg yolk for Gojuchang Carbonara for your next meal.
Meal 2
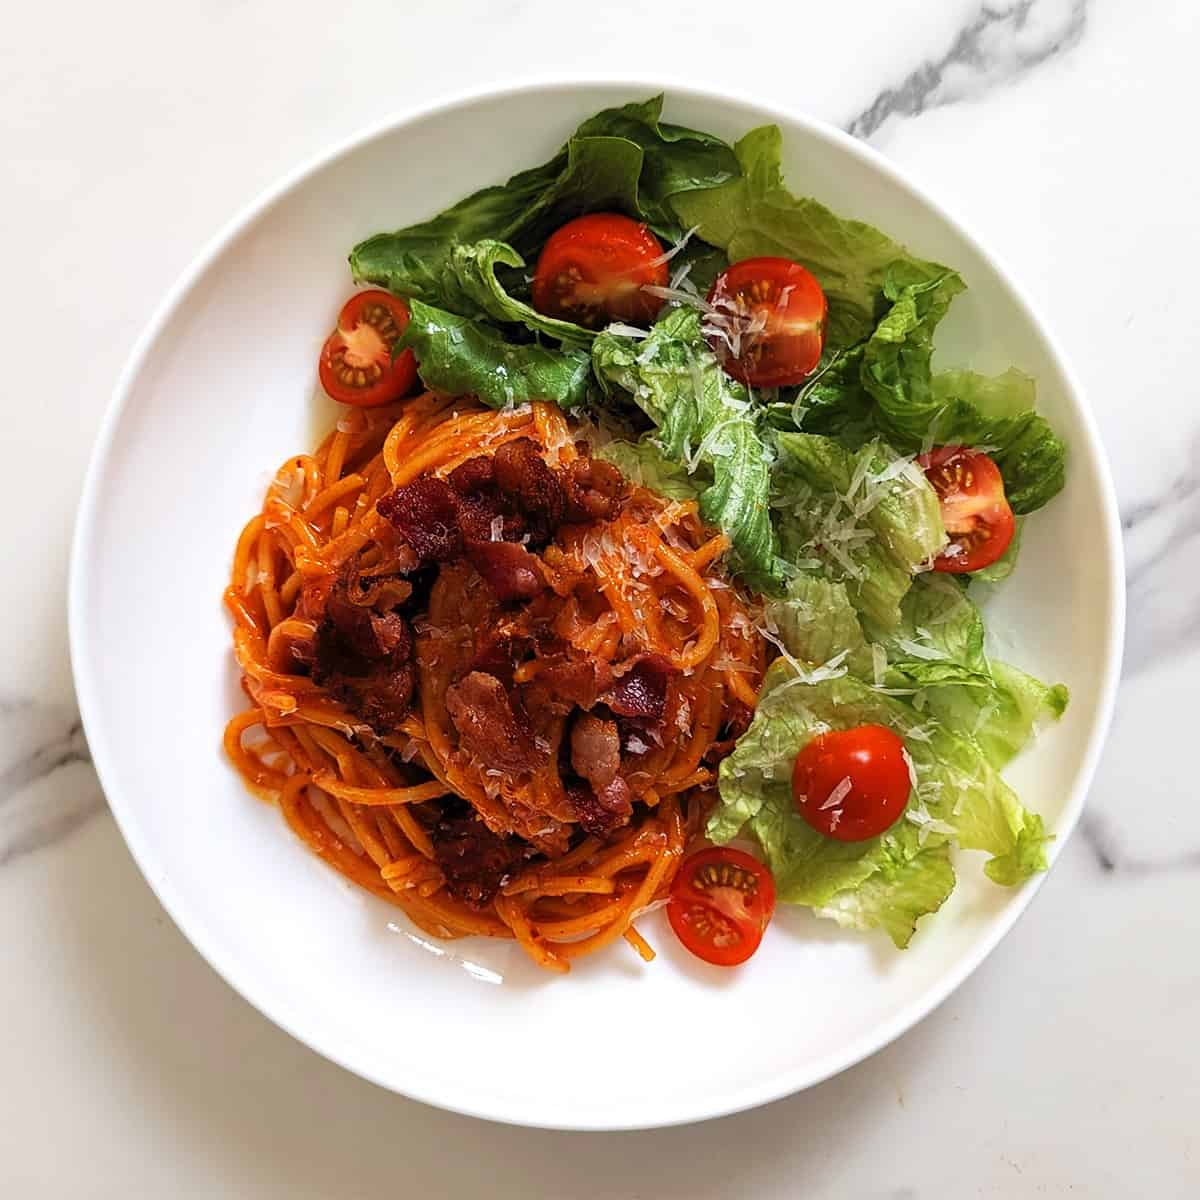
Gochujang Carbonara is a Korean twist on a classic Italian dish. You’ve likely seen lots of talk about “gochujang”, otherwise known as Korean red pepper paste, all over social media. And for good reason! It imparts a slightly sweet, smokey, and spicy flavor to anything you add it to!
I intentionally kept the salad simple to let the pasta’s flavors shine. This dish is bold. But if you’re looking for more than just plain oil and salt as a dressing, you can make a zesty vinaigrette with lemon if you have that on hand.
Sucess Tips
Temperature Matters: To achieve the perfect sauce consistency, ensure the gochujang, gochugaru, eggs, egg yolk (if using), and parmesan are at room temperature. This aids in achieving a smooth and creamy sauce. But if you’ve forgotten, I’ve got you! Check out the notes in the recipe card below.
Tossing Technique: Toss the hot pasta in the sauce immediately after draining. This step allows the pasta to absorb the flavors and ensures an even coating of the sauce.
Adjusting Sauce Consistency: If the sauce is too thick, gradually add a bit of the reserved pasta water while tossing to achieve the desired consistency.
Gochujang Carbonara is a Korean twist on a classic Italian dish. Bringing the eggs and gochujang to room temperature helps achieve a creamy consistency in the sauce. Adjust the spiciness by varying the amount of gochugaru to your preference.
Prep Time10 minutesmins
Cook Time20 minutesmins
Total Time30 minutesmins
Course: Main Course, Noodle Dish
Cuisine: Asian, Fusion, Korean
Keyword: gochujang pasta, gochujang spaghetti
Servings: 2
Equipment
Large mixing bowl
Skillet
Tongs
Ingredients
1/4headhead iceberg lettuceroughly chopped
1/4cupcherry tomatoes
5ozspaghetti
3clovesgarlicfinely minced
6slicesbaconchopped
6cupswater
1tspkosher salt
Cooking oil
Sauce:
1.5Tbspgochujangbrought to room temperature*
1tspgochugarui.e. Korean red pepper flakes
2largeeggsbrought to room temperature*
1egg yolkoptional, brought to room temperature*
1.5ozparmesanfinely grated*
1/2cuppasta waterreserved from cooking the pasta
Instructions
Add all sauce ingredients (besides pasta water) to a large bowl and mix well. Ensure the bowl is large enough to toss the pasta in. If the ingredients are not at room temperature, see notes below.
Cook the pasta in 6 cups of water with 1 tsp kosher salt until al dente, following the recommended instructions on the pasta package.
Meanwhile, cook bacon in a skillet until crisp and cooked through. Discard excess bacon grease, leaving about 1 Tbsp. Add the minced garlic and cook until lightly browned and fragrant (30 seconds – 1 minute). Transfer the mixture to the large bowl with the sauce.
When the pasta has cooked, reserve 1/2 cup of the pasta water. Immediately transfer the hot pasta into the bowl and mix everything together with a pair of tongs until well incorporated. The pasta needs to be hot for this to work. If the sauce is too thick, add a little bit of pasta water and keep tossing to loosen it. Discard any unused pasta water.
Serve immediately with a side salad of lettuce and tomatoes. The pasta will be very strong, so keep the salad simple with a quick toss of neutral oil and some salt and pepper. Top with shaved parmesan if desired.
Notes
Choosing a block of parmesan cheese rather than pre-grated is crucial because of its superior melting properties. Pre-shredded varieties often contain a starch coating that hinders proper cheese melting and coating of the pasta.If you forgot to bring eggs to room temperature: If you haven’t brought the eggs to room temperature, opt for a large, heat-resistant mixing bowl, such as aluminum or glass, for your sauce.When the pasta water reaches a boil, create a makeshift double boiler by placing the bowl on top of the pot, ensuring the water doesn’t touch the bottom of your mixing bowl.Continue to whisk the ingredients until the eggs, gochujang, and cheese are fully incorporated and have reached room temperature. Remove from heat promptly and proceed to step 2.A note on raw eggs: If you have reservations about consuming raw eggs, consider using pasteurized eggs or pasteurizing them yourself with a sous vide at 135°F for 90 minutes. It’s important to note that eating raw eggs carries a risk of salmonella and listeria. Individuals who are elderly, pregnant, immunocompromised, or young children should avoid raw eggs and egg-containing foods.
Meal 3
I originally whipped this up as a snack to use up leftover ingredients I had in the fridge, but it was so good that I ended up having it as my dinner instead. Just add rice and this is a complete meal with meat, veggies, and carbs.
Here’s another tip: If you can’t be bothered making the lettuce cups, these taste just as good deconstructed. A little less fun, yes, but with all the flavors!
And there you have it. Congratulations, you’ve made it to the end of another week! See you again in another meal plan very soon. :)
Juicy meatballs bursting with bold and bright flavors nestled in crisp lettuce cups, topped with zesty pickled daikon and carrots. Perfect as both a snack and dinner!
Prep Time15 minutesmins
Cook Time10 minutesmins
Total Time25 minutesmins
Servings: 2
Equipment
Air fryer optional
Mixing bowl
Ingredients
For the Meatballs:
1/2lbground pork
3Tbsppanko breadcrumbs
2clovesgarlicfinely minced
2stalks cilantroroughly chopped (optional)
2Tbspwater
1/2Tbspfish sauce
1tspsugar
1tspsoy sauce
Oil for spraying
For the Dipping Sauce:
1Tbspfish sauce
1Tbsplime juicepreferably fresh squeezed
2.5tspsugar
1small Thai chilisliced thinly (or a pinch of red pepper flakes if preferred)
1/2Tbspwater
For Serving:
1/2head iceberg lettuceleaves separated and torn to about the same size for wrapping
1/4cuppickled daikon and carrotssee recipe for Vietnamese Pickled Carrots and Daikon
Steamed white rice
Instructions
Whisk dipping sauce ingredients together into a small bowl until the sugar has dissolved (you can microwave this for 30 seconds to help this along). Set aside.
Mix meatball ingredients together in a mixing bowl with clean hands. Mix/stir in one direction until the mixture is well combined and becomes sticky.
Roll 1.5-inch sized meatballs. Preheat the air fryer to 400F. Place the meatballs in a single layer. Spray generously with cooking oil and cook for 6-8 minutes until browned and cooked through.
Fill each lettuce cup with the meatball and pickled daikon and carrots. Drizzle with dipping sauce and garnish with more cilantro if desired. Serve with steamed white rice.
Notes
Oven method: If you don’t have an air fryer, you can use a conventional oven preheated to the same temperature. Bake for 5-10 minutes more until cooked through.For the pickled daikon and carrots, please see the separate recipe provided.Freezer friendly: Feel free to double the recipe for the meatballs and freeze for up to 2 months. Alternatively, if you have rice paper on hand, shred the lettuce and slice the meatballs in half instead. Then, layer them onto the rice paper and roll them up into a Vietnamese spring roll. Bring it to work for a mess-free bento experience!
These pickled daikon and carrots are a fantastic addition to various dishes, especially Vietnamese cuisine. They add a delightful crunch and tangy flavor to your meals.
Prep Time15 minutesmins
Cook Time5 minutesmins
Resting Time30 minutesmins
Total Time50 minutesmins
Course: Appetizer, Side Dish
Cuisine: Asian, Vietnamese
Keyword: Asian Pickled Vegetables, Pickled Carrots and Radish, Vietnamese Pickles
Servings: 8oz
Equipment
1 mason jar with lid 16 oz capacity
Ingredients
4ozcarrotjulienned
4ozdaikonjulienned
1.5tspkosher salt
For the Pickle Solution:
3/4cupwater
5Tbspsugar
4Tbspwhite vinegar
Instructions
Keep hands clean throughout the entire recipe for best results. Mix the carrots, daikon, and kosher salt in a bowl for 15 minutes to let the veggies sweat.
Meanwhile, add all ingredients for the pickle solution in a small saucepan and bring it to boil over medium high heat. Stir and mix well until sugar has dissolved completely.
Using clean hands and a cheesecloth, squeeze out the excess water from the carrots and daikon. Transfer to a clean 16 oz mason jar or a tall airtight container and pack the carrots/daikon tightly. Pour the pickle solution into the jar – it should just cover the carrots and daikon. If not, you can add a little bit of filtered water to top up.
Let it cool for 30 minutes before putting a lid on and transferring to a fridge. You can use it at this stage for a quick pickle. The flavor will build over time and keep well for up to 5 months if you always use clean utensils to take the pickle out of the jar.
Notes
Ensure you maintain cleanliness throughout the process to ensure the longevity and safety of your pickles.Some food pairings that go well with pickled carrots and daikon:
Vietnamese fried egg rolls. Wrap egg rolls with lettuce leaves and pickled carrots for a complete meal.
In a banh mi.
As a side with Lemongrass Pork Chop or Chicken.
Any Asian style fried chicken (e.g. Japanese karaage, Korean fried chicken).
If you enjoyed this meal plan, please share it on Instagram, Facebook, TikTok or your favorite social media platform!
I’m a foodie with a simple philosophy: why should amazing food be reserved for the weekends alone? I’m all about making every meal delicious because, let’s face it, we only have so many meals in our lifetime.
My mission? To take the stress out of cooking with easy-to-use meal plans so you can enjoy mouthwatering recipes any day of week. Join me on this tasty journey and let’s savor “more taste, less waste” in every bite!
I’m a foodie with a simple philosophy: why should amazing food be reserved for the weekends alone? I’m all about making every meal delicious because, let’s face it, we only have so many meals in our lifetime.
My mission? To take the stress out of cooking with easy-to-use meal plans so you can enjoy mouthwatering recipes any day of week. Join me on this tasty journey and let’s savor “more taste, less waste” in every bite!





Lori
Easy and delicious. Uses the air fryer to “fried” the shrimp in a healthier way :)
10 months ago